最終更新日 2009年12月17日
計算尺
calc Ver.1.0
このソフトは、高知大学教育学部の「初等数学」の授業のために作った、
計算尺を作るためのソフトです。「初等数学」の授業のためにアップしました。
このプログラム calc.exe 使い方は簡単で、実行すると
となります。
「表示」のメニューの「計算尺画面」を選択すると
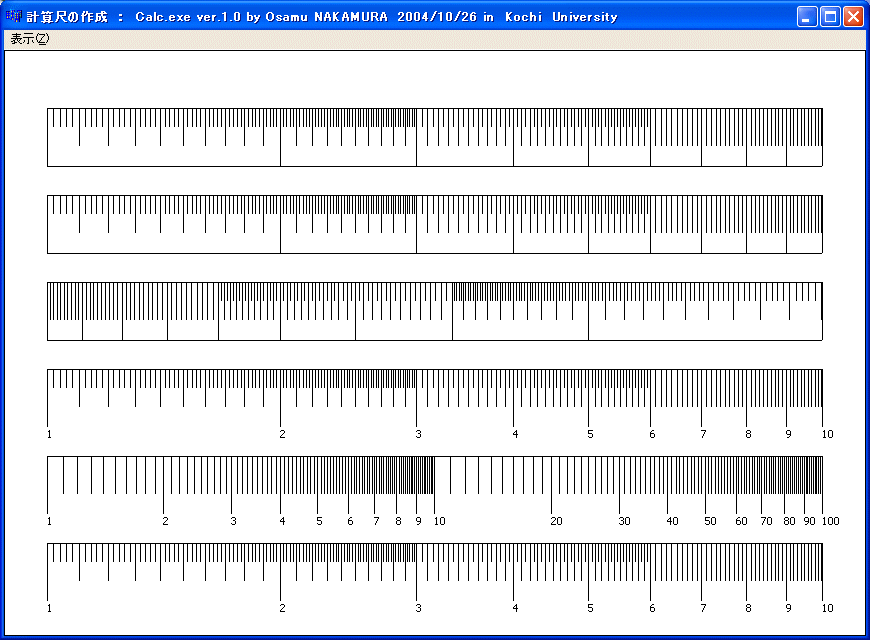
となります。
「表示」のメニューの「計算尺プリンタ」を選択すると上の図形をプリンタで印刷できます。
「表示」のメニューの「ネピア画面」を選択すると
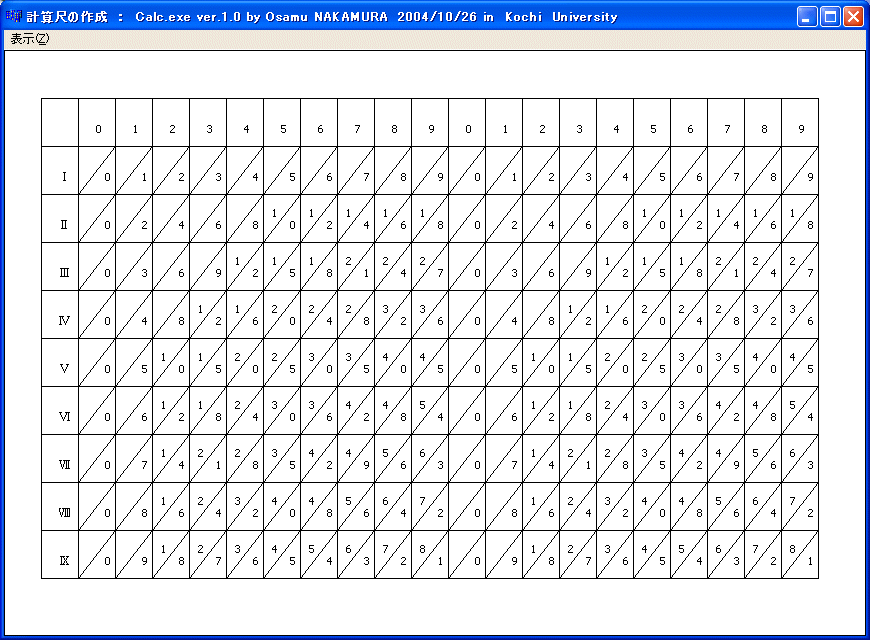
となります。
「表示」のメニューの「ネピアプリンタ」を選択すると上の図形をプリンタで印刷できます。
このような図を描くには、普通、 C++ や Java が使われます。
Calc.exe は Borland C++ Builder を使っていますが、上の図形をプリンタで印刷するためには
Java では次のようなプログラムを作って実行します。
import java.awt.*;
import java.awt.print.*;
public class Calc {
public static void main(String args[]) {
PrinterJob pj=PrinterJob.getPrinterJob();
pj.setPrintable(new calcPrint());
try {
pj.print();
} catch (Exception e) {}
}
}
class calcPrint implements Printable {
public int print(Graphics g,PageFormat fmt,int index) {
if (index!=0)
return NO_SUCH_PAGE;
double x = fmt.getImageableX();
double y = fmt.getImageableY();
double w = fmt.getImageableWidth();
double h = fmt.getImageableHeight();
double sw = w /25;
double sh = h / 32;
double ox = x + sw - 4 * sw;
double oy = y + sh;
g.setColor(Color.black);
for (int i=0; i<6; i++) {
ox += 4 * sw;
g.drawLine((int)ox, (int)oy, (int)ox, (int)(oy+30*sh));
if (i < 3) {
g.drawLine((int)(ox+3*sw), (int)oy,
(int)(ox+3*sw), (int)(oy+30*sh));
}
if ((i < 2)||(i == 3)||(i == 5)) {
for (double k=1; k<=10; k++) {
g.drawLine((int)ox, (int)(oy+30*sh*(Math.log(k)/Math.log(10))),
(int)(ox+3*sw), (int)(oy+30*sh*(Math.log(k)/Math.log(10))));
}
for (double k=1; k<=10; k+=0.1) {
g.drawLine((int)ox, (int)(oy+30*sh*(Math.log(k)/Math.log(10))),
(int)(ox+2*sw), (int)(oy+30*sh*(Math.log(k)/Math.log(10))));
}
} else if (i==2) {
for (double k=1; k<=10; k++) {
g.drawLine((int)ox,
(int)(oy+30*sh*(1-Math.log(k)/Math.log(10))),
(int)(ox+3*sw),
(int)(oy+30*sh*(1-Math.log(k)/Math.log(10))));
}
for (double k=1; k<=10; k+=0.1) {
g.drawLine((int)ox,
(int)(oy+30*sh*(1-Math.log(k)/Math.log(10))),
(int)(ox+2*sw),
(int)(oy+30*sh*(1-Math.log(k)/Math.log(10))));
}
} else {
for (double k=1; k<=10; k++) {
g.drawLine((int)ox, (int)(oy+15*sh*(Math.log(k)/Math.log(10))),
(int)(ox+3*sw), (int)(oy+15*sh*(Math.log(k)/Math.log(10))));
}
for (double k=1; k<=10; k+=0.1) {
g.drawLine((int)ox, (int)(oy+15*sh*(Math.log(k)/Math.log(10))),
(int)(ox+2*sw), (int)(oy+15*sh*(Math.log(k)/Math.log(10))));
}
for (double k=1; k<=10; k++) {
g.drawLine((int)ox,
(int)(oy+15*sh*(1+Math.log(k)/Math.log(10))),
(int)(ox+3*sw),
(int)(oy+15*sh*(1+Math.log(k)/Math.log(10))));
}
for (double k=1; k<=10; k+=0.1) {
g.drawLine((int)ox,
(int)(oy+15*sh*(1+Math.log(k)/Math.log(10))),
(int)(ox+2*sw),
(int)(oy+15*sh*(1+Math.log(k)/Math.log(10))));
}
}
}
return PAGE_EXISTS;
}
}
なかなか大変です。私は高知大学教育学部で小学校の教員を目指す学生さん達に
「初等数学」という授業の中でタートル・グラフィックスを
教えていますが、その授業の為に作ったソフトを元に、HUMMINGBIRD を作りました。
HUMMINGBIRD は、1980 年代のマイコンの時代のように、十個ぐらいの命令を覚えて、
後は考えることによりプログラミングできる言語を目指して作りました。
HUMMINGBIRD では上の図を描くのに、次のようにプログラムし、画面を印刷すれば良いです。
TO keisanjyaku
for :k=1 to 6 [
if :k<4 [
pu setx -250 sety 120-55*(:k-1)+40 pd setx 250
]
pu setx -250 sety 120-55*(:k-1)
if (:k < 3)||(:k==4)||(:k==6) [
for :i=1 to 10 [
setx -250+500*(log :i)/(log 10) pd fd 40 bk 40
]
for :x=1 to 10 step 0.1 [
setx -250+500*(log :x)/(log 10) pd fd 20 bk 20
]
] [ if :k==3 [
for :i=10 downto 1 [
setx -250+500*(1-(log :i)/(log 10)) pd fd 40 bk 40
]
for :x=10 downto 1 step 0.1 [
setx -250+500*(1-(log :x)/(log 10)) pd fd 20 bk 20
]
] [
for :i=1 to 10 [
setx -250+250*(log :i)/(log 10) pd fd 40 bk 40
]
for :x=1 to 10 step 0.2 [
setx -250+250*(log :x)/(log 10) pd fd 20 bk 20
]
for :i=10 to 100 step 10 [
setx -250+250*(log :i)/(log 10) pd fd 40 bk 40
]
for :x=10 to 100 step 2 [
setx -250+250*(log :x)/(log 10) pd fd 20 bk 20
]
]
]
]
end
随分、簡単になったと思いませんか? 勿論、KITE でも実行できます。

Calc.EXE のダウンロ ード